Total Posts 191 Last Updated 23 November 2015 12:00 PM (GMT +8)
Tuesday, October 15, 2013
Rose Levy Beranbaum's Basic Brioche


Yesterday I took leave from the day job, my first rest after a long, long time. Instead of kicking back with a book or a copy from that growing pile of unread food magazines to take it easy, I decided to make bread (one that requires careful nursing around a regimented schedule, not unlike feeding a baby no less). After spending so much time at work and the cafe's kitchen on Saturdays, my own kitchen barely knew me anymore. It was time to make amends and rekindle our relationship.


It all started with my discovery of these amazing chorizo sausages from the local groceries near work. Huge and succulent, they were perfect with scrambled eggs and some spicy agile olio. But they would also be perfect for Vijay's latest obsession - the cafe's pork burger. The ensemble is simple - spicy sausages reshaped into a juicy patty, melted Monterey Jack, slightly tart applesauce from the greenest Granny Smiths (and a cinnamon stick), rocket leaves, stacked in between the most buttery, flavorful brioche bun one can dream of.

I still stand by the notion that bread making is therapeutic. Not that this brioche requires any kneading by hand (if you are interested to make one that does, try Dan Lepard's), but those hours spent waiting in anticipation (and to be honest, near impatience) for the dough to rise and the loaf to cook, permeating the air with promises of immense satisfaction are moments one can never get by procuring a loaf from the best bakery. These slow foods forces me to focus and take pleasure in the smallest things.

My next day off seems too far in the unforeseeable future but I have a feeling I will see another loaf of brioche as soon as it comes.
Basic Brioche
Adapted barely from Rose Levy Beranbaum's The Bread Bible.
Yield: 16 small brioches OR one 8 1/2" x 4 1/2" x 4 1/2" loaf OR (in this case) 6 4" square 2" tall buns.
Note: I started the recipe one day ahead - variation of fermenting times are indicated in the recipe. The shaping instructions here are based on my buns and baking tins, for other variations do refer to the verbatim recipe in the Epicurious link above. In Beranbaum's 'Pointers for Success' section, the issue of mixers with raise bowl adjustment suggests the usage of the paddle beater - I used the dough hook on my regular Kitchen Aid, just scrape the bottom of the bowl in between mixing. The usage of a baking sheet or baking stone helps regulate heat on the sides and bottom of the bread tin, be sure not to skip this. My eggs were slightly larger - 64 grams weighed in the shell - I included them without much incident.
Dough Starter (Sponge):Flour mixture:
- 2 tablespoons/1 ounce/29.5 grams) water, at room temperature (70° to 90°F)
- 1 tablespoon/scant 0.5 ounce/12.5 grams sugar
- 1/4 teaspoons/0.8 grams instant yeast
- 1/2 cup/2.5 ounces/71 grams unbleached all-purpose flour (I used Pillsbury)
- 1 large egg (2 ounces/58 grams weighed in the shell)
Egg Glaze:
- 1 cup plus 1 1/2 tablespoons/5.5 ounces/156 grams unbleached all-purpose flour
- 2 tablespoons/about 0.75 ounce/25 grams sugar
- 1 1/4 teaspoons/4 grams instant yeast
- 1/2 teaspoon/3.3 grams salt
- 2 large eggs, cold (4 ounces/113 grams weighed in shells)
- 8 tablespoons/4 ounces/113 grams unsalted butter, very soft
- 1 large egg yolk (1 tablespoon)
- 1 teaspoon milk
One day or up to 2 days ahead, make the dough: In the mixer bowl, place the water, sugar, instant yeast, flour, and egg. Whisk by hand until very smooth, to incorporate air, about 3 minutes. The sponge will be the consistency of a very thick batter. Scrape down the sides of the bowl and set it aside, covered with plastic wrap.
Combine the ingredients for the flour mixture and add to the sponge: In a small bowl, whisk the flour with the sugar and yeast. Then whisk in the salt (this keeps the yeast from coming in contact with the salt, which would kill it). Sprinkle this mixture on top of the sponge. Cover it tightly with plastic wrap and let it stand for 1 1/2 to 2 hours at room temperature. (During this time, the sponge will bubble through the flour mixture in places; this is fine.) For the best flavor development, allow the sponge to ferment for 1 hour at room temperature, then refrigerate it for up to 24 hours (I did 2 hours at room temperature).
Mix the dough: Add the 2 cold eggs and mix with the dough hook on low (#2 if using a KitchenAid) for about 1 minute or until the flour is moistened. Raise the speed to medium (#4 KitchenAid) and beat for 2 minutes. Scrape the sides of the bowl with an oiled spatula and continue beating for about 5 minutes longer or until the dough is smooth and shiny but very soft and sticky. It will mass around the dough hook but not pull away from the bowl completely. Add the butter by gradually, waiting until each addition is almost completely absorbed before adding the next tablespoon, beating until all the butter is incorporated. The dough will be very soft and elastic and will stick to your fingers unmercifully (up to this point I handled the dough with an oiled spatula, no fingers needed), but don’t be tempted to add more flour at this point; it will firm considerably after chilling. (The dough will weigh about 19 ounces/536 grams.)
Let the dough rise: Using an oiled spatula or dough scraper, scrape the dough into a 1-quart dough rising container or bowl, greased lightly with cooking spray or oil. Lightly spray or oil the top of the dough and cover the container with a lid or plastic wrap. With a piece of tape, mark the side of the container at approximately where double the height of the dough would be. Allow the dough to rise until doubled, 1 1/2 to 2 hours. (I eyeballed the size and proofed for 2 hours.)
Chill the dough: Refrigerate the dough for 1 hour to firm it; this will prevent the butter from separating. Gently deflate the dough by stirring it with a rubber scraper or spatula, and return it to the refrigerator for 1 more hour so that it will be less sticky and easier to handle.
Deflate the dough and allow it to rest, chilled: Turn the dough out onto a well-floured surface and press or roll it into a rectangle, flouring the surface and dough as needed to keep it from sticking. The exact size of the rectangle is not important. Give the dough a business letter turn, brushing off any excess flour, and again press down or roll it out into a rectangle. Rotate it 90 degrees so that the closed side is facing to your left. Give it a second business letter turn and round the corners. Dust it lightly on all sides with flour. Wrap it loosely but securely in plastic wrap and then place it in a large zip-seal bag. Refrigerate for at least 6 hours or up to 2 days to allow the dough to ripen (develop flavor) and firm. (I did 3 turns and chilled the dough for 12 hours.)
Shape the dough and let it rise: Generously butter 2 8 12 x 4 1/2 loaf tins. Remove the dough from the refrigerator and gently press it down to deflate it, then press or roll the dough into a rectangle about 7 1/2 inches long and 5 inches wide. Roll it down from the top in 3 turns, being sure to brush off any excess flour, pressing with your thumbs to seal the dough. Place it seam side down on a floured surface, then using a dough/pastry cutter, divide the dough into 6 portions. Place 3 in each prepared pan, pressing down firmly. Cover lightly with oiled plastic wrap and allow it to rise until doubled, (ideally at 75° to 80°F) for about 1 1/2 to 2 hours. (Mine took 2 hours.)
Bake the bread: Preheat the oven to 350°F/180°C about 1/2 hour before baking. Have an oven shelf at the lower level and place a baking stone or baking sheet on it before preheating. Lightly beat together the egg yolk and milk for the glaze. Brush the top of the brioche with the egg glaze, being careful not to drip any on the side of the pans, or it will impede rising. (I sprinkled one loaf with white and black sesame seeds.) Bake for 15 to 20 minutes (mine took about 17 minutes), or until a skewer inserted comes out clean. Remove the brioche from the oven and unmold them onto a wire rack. Turn top side up and allow them to cool until barely warm, about 1 hour.
Life Is Great explores the incredible world of food and cooking. We hope to share with you our most delicious moments and inspirations.
“Just like becoming an expert in wine–you learn by drinking it, the best you can afford–you learn about great food by finding the best there is, whether simply or luxurious. The you savor it, analyze it, and discuss it with your companions, and you compare it with other experiences.”
Julia Child (Mastering the Art of French Cooking)
“Life is short. Live your dream and share your passion.”
RESOURCES
RECIPES

CAKE ORDERS

EATING OUT
FOOD READS
SUBSCRIPTION
RECENT RECIPES
- Gooey Cinnamon Cake
- Chinese Crispy Roast Pork Belly (Siu Yuk 烧肉)
- ABC Soup (罗宋汤)
- Kong Bak Pau (扣肉包)
- Pandan Chiffon Cake (Improved)
- Crispy Fried Egg
- Tamago Kake Gohan (卵かけご飯)
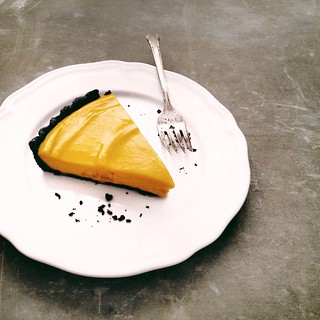
- Strawberry Pie
- One Pot Chicken Rice
- Bak Chor Mee (肉脞面 - Minced Pork Noodle)
- Hakka Salted Egg Steamed Pork (咸蛋蒸猪肉)
RECENT TRAVELS
- Hong Kong Part III
- Hong Kong Part II: Zongzi/Bakchang (粽子/肉粽)
- Caffè HABITŪ (the table) at G.O.D. Causeway Bay, Hong Kong
- Hong Kong Part I
- Australia 2010 Part 1: Melbourne
- Bourke Street Bakery, Sydney
- Il Fornaio, St Kilda
- Queen Victoria Market, Melbourne
ARCHIVES
FEEDBACK
Recent Comments
8 Comments on Rose Levy Beranbaum's Basic Brioche
Pick Yin, your brioche looks so good with all that tender loving care it needs. Indeed breadbaking is very therapeutic which needs time and tenderloving care. I'm glad you took time to rekindle your relationship with your kitchen :)
Posted by Unknown, at
Oct 16, 2013, 4:28:00 PM
Unknown, at
Oct 16, 2013, 4:28:00 PM
Wow! I was fascinated and read every word! I am allows in a hurry this would make me calm down immensely. How rewarding. lovely recipe. enjoy!
Posted by Karin@yumandmore, at
Oct 17, 2013, 1:21:00 AM
Karin@yumandmore, at
Oct 17, 2013, 1:21:00 AM
when i first purchased this book, years ago, i was not impressed with it. but then i forced myself to really read it, to be patient and i now think it's one of the best & comprehensive cookbooks out there. i was reminded of it recently when i made her carrot bread.
your brioche looks absolutely beautiful.
Posted by Lan | MoreStomach, at
Oct 17, 2013, 10:46:00 PM
Lan | MoreStomach, at
Oct 17, 2013, 10:46:00 PM
great write up there! and your photos look so appetising. good work there :)
Posted by Vi Vian, at
Oct 20, 2013, 4:22:00 PM
Vi Vian, at
Oct 20, 2013, 4:22:00 PM
Perfect golden colour on that brioche pick yin! need to get hold of that book- recipe looks like a winner!
Posted by Shu Han, at
Oct 23, 2013, 1:26:00 PM
Shu Han, at
Oct 23, 2013, 1:26:00 PM
Thank you all for the kind words! Beranbaum's book is really a bible. I highly recommend it, even for novice bakers.
Posted by PickYin, at
Oct 31, 2013, 10:42:00 AM
PickYin, at
Oct 31, 2013, 10:42:00 AM
Hello, at the beginning you say 'Yield: 16 small brioches OR one 8 1/2" x 4 1/2" x 4 1/2" loaf' but in the recipe you mention; 'Generously butter 2 8 12 x 4 1/2 loaf tins'
What do we do with the second loaf pan?
Thank you, I love your site!
Posted by Anonymous, at
Feb 9, 2014, 2:02:00 AM
Anonymous, at
Feb 9, 2014, 2:02:00 AM
Hi Anon, that's because I split the dough into the 2 loaf pans to bake flatter bun height loaves for the burger. You can fit everything into one pan and bake a tall loaf!
Posted by PickYin, at
Feb 11, 2014, 9:52:00 AM
PickYin, at
Feb 11, 2014, 9:52:00 AM
Post a Comment