Total Posts 191 Last Updated 23 November 2015 12:00 PM (GMT +8)
Monday, June 27, 2011
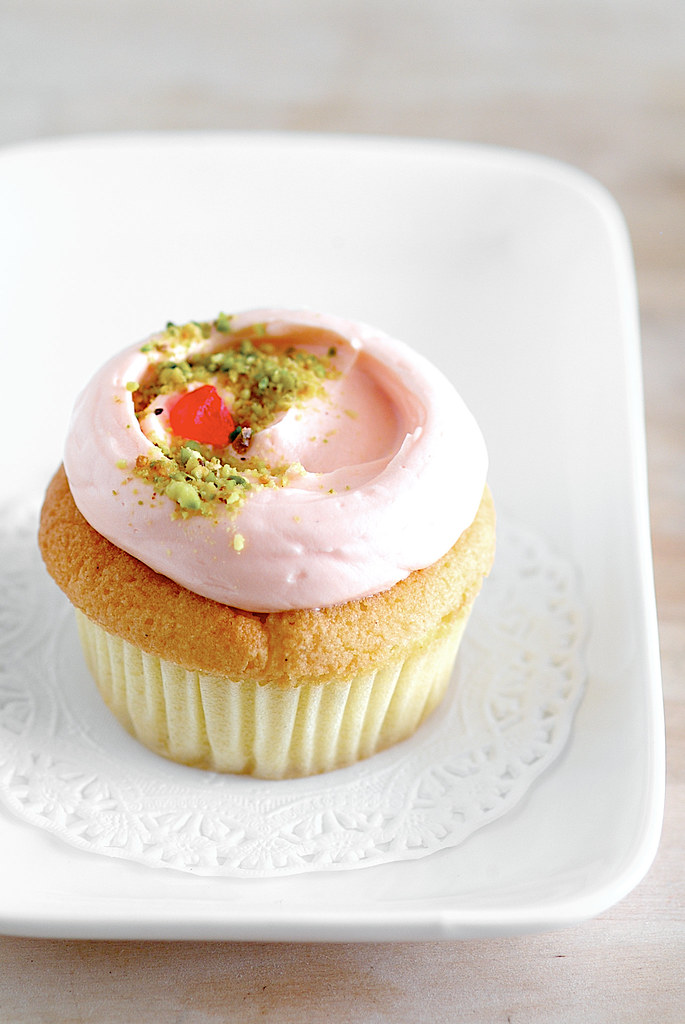
Magnolia's Vanilla Cupcakes

Two things were established when I produced my first ever batch of cupcakes for sale last week - I would eat my client's request and send them a couple of cupcakes short. Having been told this, you'd probably forget about ever commissioning any baked goods from me but I had good reasons to deliver my friend 58 cupcakes instead of the 60 I promised. Despite being thought of as the baker/cake lady/dessert girl amongst friends with much (uninformed) confidence in my many follies around flour, butter and sugar, I've really only ever made this cupcake and several other cupcake-convertible cakes. With such a limited repertoire I decided to venture a little and convinced my uninitiated customer to accept this new-to-me white cake to make up one half of her order.

Known to be the most popular cupcake at New York City's Magnolia Bakery, the recipe was already next in line on my baking schedule. A straight forward creaming-method cake with some good old vanilla is sometimes just what we need, away from hours of slaving over separating eggs, melting chocolate or whipping meringues. Not that I'd never entertain this sort of madness even when faced with the prospect of coughing up 60 cupcakes; considering that I've done all those things and more to make just one cake, but I really wanted to

Having already made 33 of another first-time cupcake attempt and eaten one for quality control, I expected to bake the rest of the 28 out of this recipe, happily ignoring the fact that the yield stated only about 24. As I counted the results of my handiwork I realized that I was not only already missing one cupcake - if I were to test one from this batch I'd no longer be the cupcake lady to my client but more of a cupcake monster. After a few minutes of agonizing over the


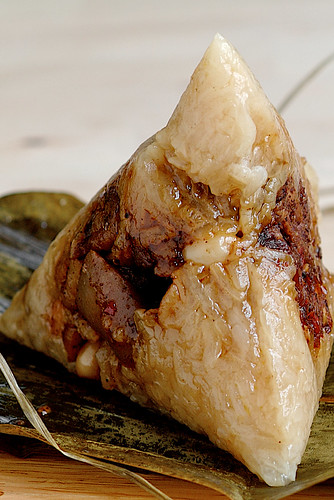
Only I ended up eating just a quarter. It was so good, Vijay demanded the rest of our test cupcake after taking his first bite. Fluffy, moist, buttery and filling our entire flat with the sweet scent of vanilla, I could see why this is Magnolia's best selling. As I stared at the crumbs on my cupcake liner and then proceeded to slowly lick every last bit of them off, I briefly entertained thoughts of calling the client in sadness to report some made up story of how I accidentally dropped all of the them onto my kitchen floor or how the taste test turned out really bad to avoid having to deliver any of them at all. Luckily for her though, I came to my senses and loved her enough to reluctantly resign myself to the reality that I wouldn't be able to continue my bliss unless I baked another batch.

Which I would've done on a heartbeat, if only, oh if only cupcakes can look this adorable without being dressed up with some form of frosting. At this point I'll come clean and tell you the other reason I was so excited to make this. As a sucker for all things pretty I wanted to try out this no-piping-swirl technique seen on many of Magnolia's cakes and some other places. It covers the cake with just enough frosting and provides a flat surface for my intended embellishments of crushed pistachios and dried cherries. After some maverick moves on the first cupcake though, I had to improvise with the help of a piping bag. My narrow spatula wasn't enough to produce a neat plonk of a blob of frosting on the cupcakes. Fiddling around too much just made a mess so I piped the buttercream on with a huge round tip before making the swirl with my inadequate spatula. I think a bit of practice and a light touch would get this mastered, as Xiaolu and I suspected, though for a beginner like me, it took me twice as long to ice these babies compared to the other half of the cupcakes with just the standard star tip swirl.
Speaking of which, in case you're still wondering when I'll ever get to that other half of this transaction, I think it would be best to tell you about them some other time. This is because they were made from an equally famous cake (trust me, the fan club for this non-human performer is viral), one that would threaten to steal the limelight away from this unassuming yet amazing vanilla cake.
Magnolia's Vanilla Cupcakes
Adapted barely from Allysa Torey and Jennifer Appel's The Complete Magnolia Bakery Cookbook, Recipes from the World-Famous Bakery and Allysa Torey's Home Kitchen
Yields about 24 cupcakes
Note: I added vanilla paste for more flavor but I believe it'll be as good without. I didn't use Magnolia's classic not-really-a-buttercream frosting paired with this cupcake because it wouldn't have held up well in our weather and would really be too sweet for most people - just the thought of using 6-8 cups of sugar for one frosting recipe made my head hurt. Also, I didn't want to chill the cupcakes unnecessarily to keep them from drying out - as Magnolia recommended themselves. I went with this Swiss meringue buttercream from my birthday cake last year - one portion should ice about 20 cupcakes. Feel free to try this as well (Deb's recipe has a higher butter ratio) or go with your own favorite buttercream recipe. If you would like to make a layer cake instead of cupcakes, divide the batter between two 9-inch round cake pans and bake the layers for 30 to 40 minutes.
- 1 1/2 cups self-rising flour (1+ cup self-rising flour = 1 cup sifted all-purpose flour + 1 1/2 teaspoons baking powder + 1/2 teaspoon salt)
- 1 1/4 cups all-purpose flour
- 1 cup (2 sticks) unsalted butter, softened
- 2 cups granulated/castor sugar
- 4 large eggs, at room temperature
- 1 cup milk
- 1 teaspoon pure vanilla extract
- 1 teaspoon pure vanilla paste (optional)
Preheat oven to 350°F. Prepare two standard 12-cup muffin tins with cupcake liners.
In a small bowl, combine the flours and set aside. In a large bowl, on the medium speed of an electric mixer, cream the butter until smooth. Add the sugar gradually and beat until fluffy, about 3 minutes. Add in the eggs, one at a time, beating well after each addition. Add the dry ingredients in three parts, alternating with the milk, vanilla extract and vanilla paste. With each addition, beat until the ingredients are incorporated, taking care not to overbeat. Using a rubber spatula, scrape down the batter in the mixing bowl to make sure all the ingredients are well blended.
Carefully spoon the batter into the cupcake liners, filling them about three-quarters full (I filled mine slightly more to get higher cupcakes but still got 27 cupcakes!). Bake for 20-25 minutes or until a cake tester inserted into the center of the cupcake comes out clean. Cool the cupcakes in the tins for 10-15 minutes. Remove from the tins and cool completely on a wire rack before icing.
Do ahead: Cupcakes can be made up to 2 days before, store covered between layers of parchment at room temperature. Swiss meringue buttercream can be made ahead and refrigerated till needed. Bring to room temperature and whip to a smooth consistency before frosting.


Continue reading Magnolia's Vanilla Cupcakes
Tuesday, June 21, 2011
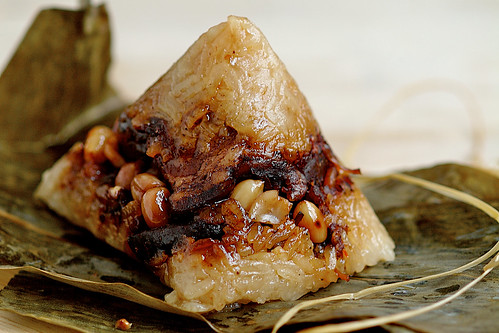
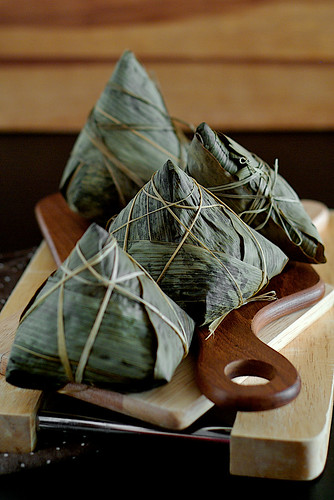
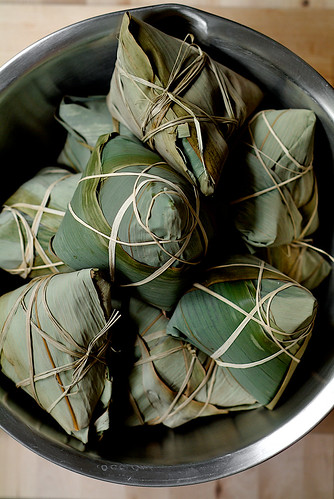
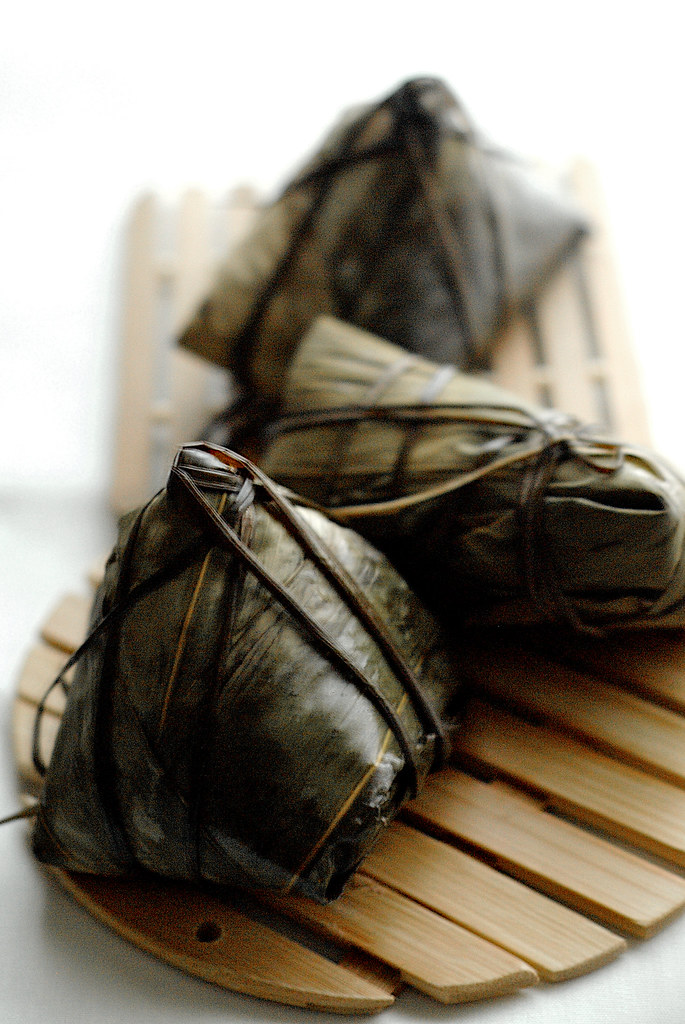
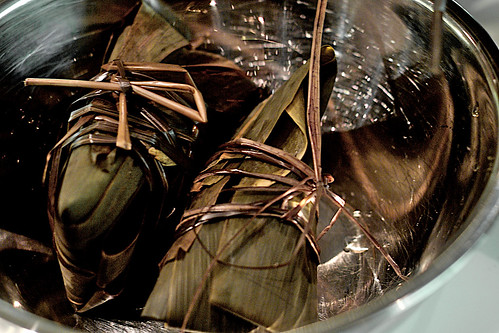
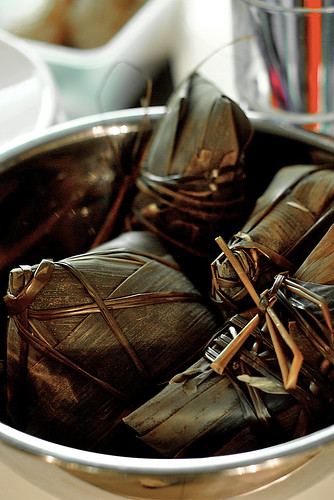
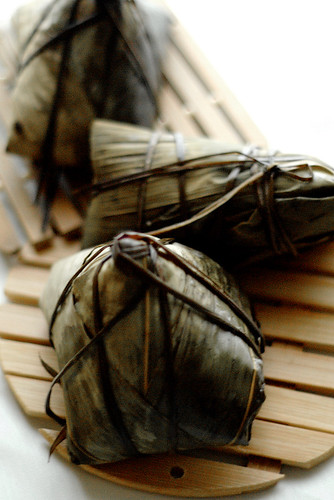
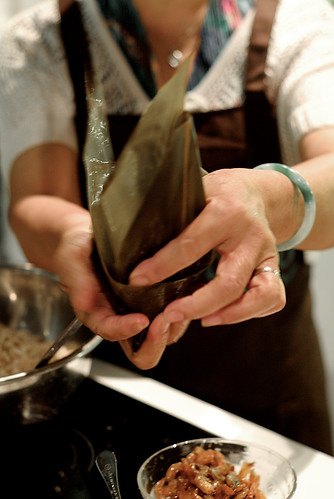
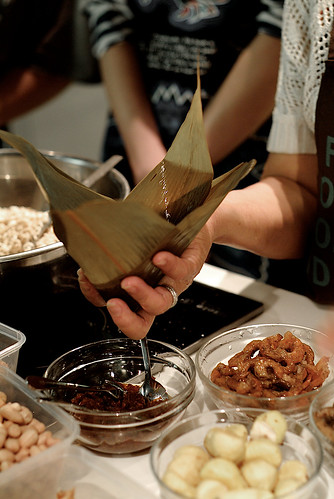
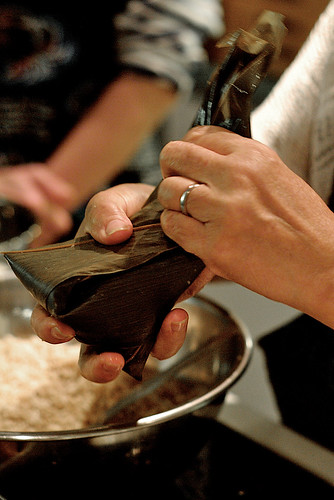
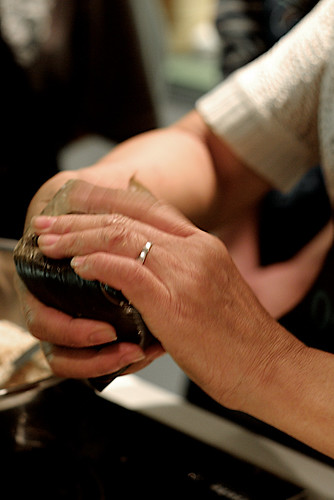
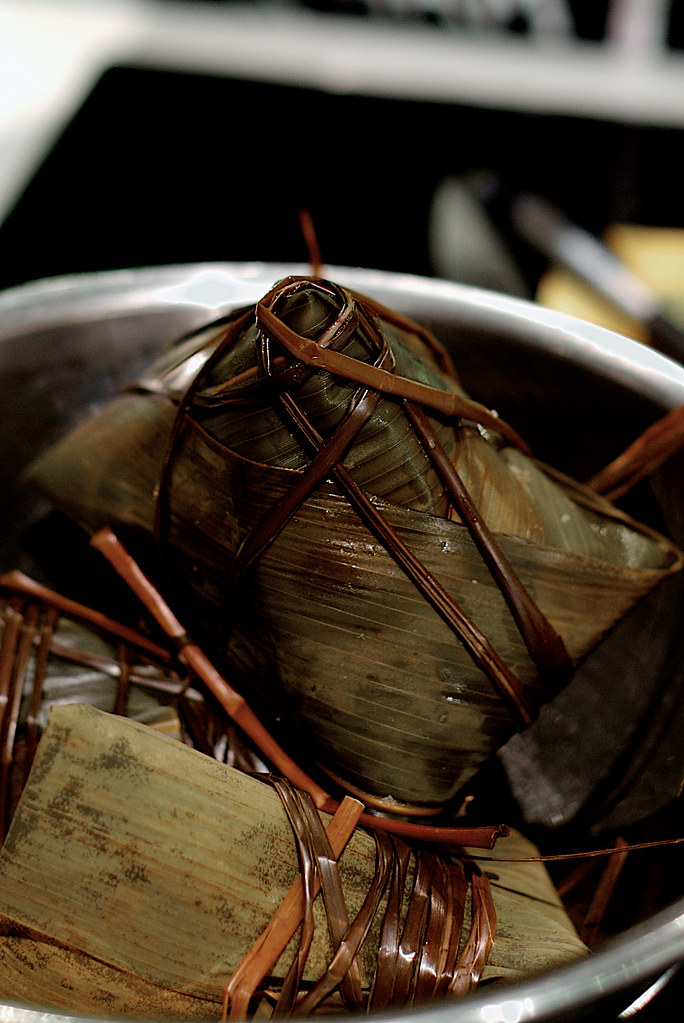
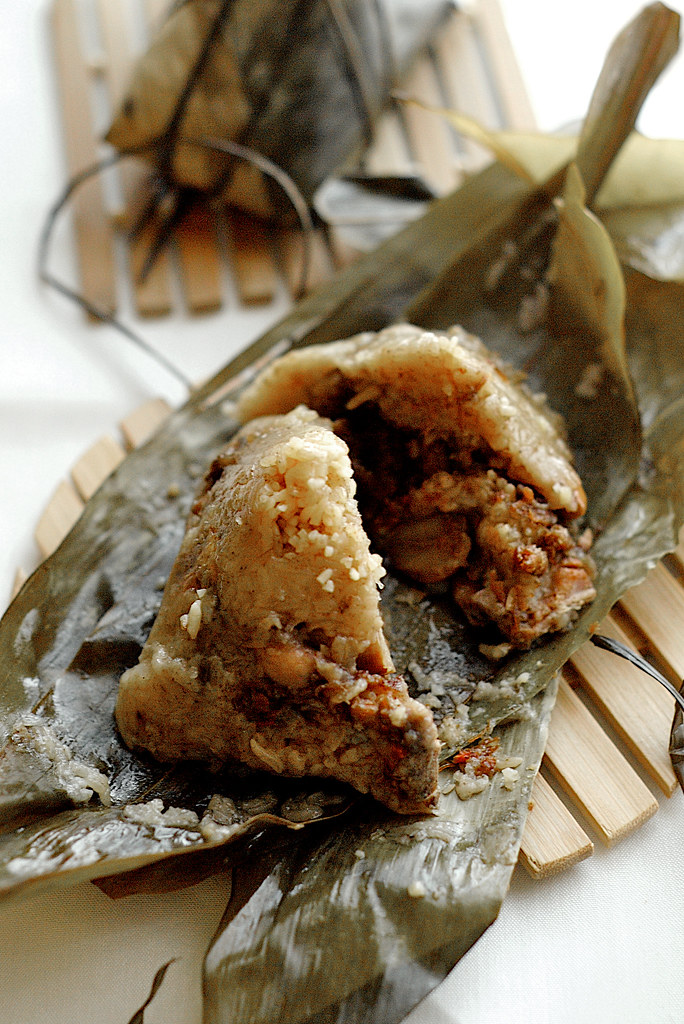
Cantonese Savory Glutinous Rice Dumplings/Zongzi (粽子)
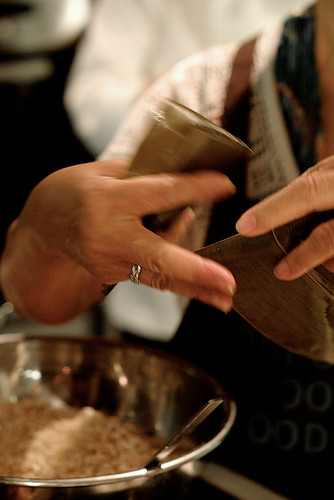
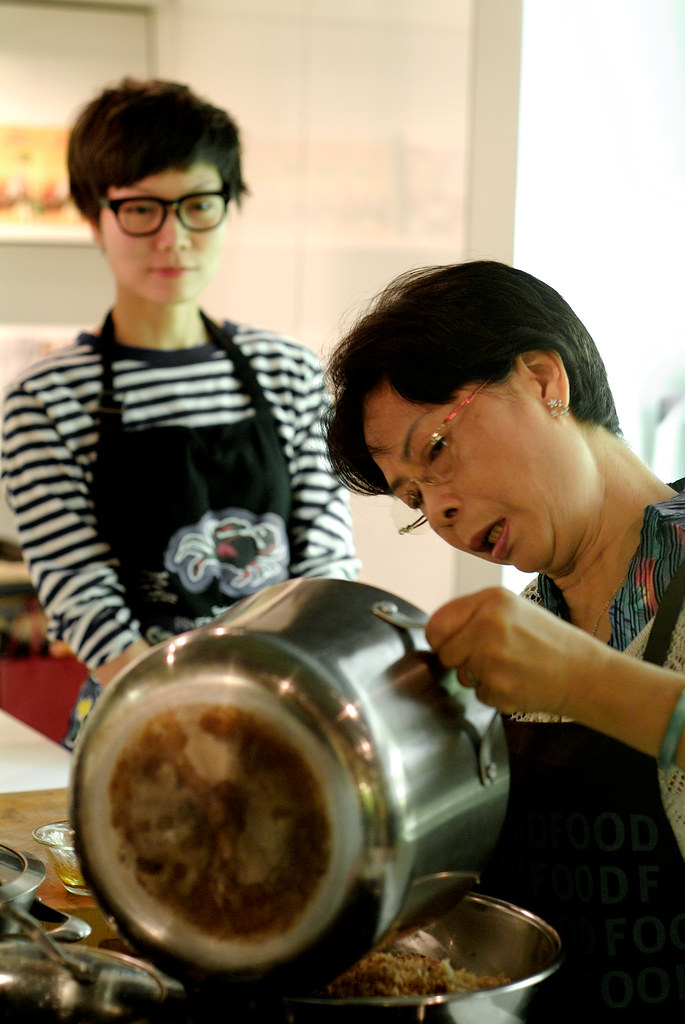
I have several 'mad' dishes lined up to be attempted this year (there's really only six months left of 2011, how's that for time flies?) but wrapping these Cantonese dumplings was not at all planned, or thought to be possible by myself. There was no help and all I had for guidance were some vague images from a 2-hour class in Hong Kong and a couple of tips via Twitter from a fellow Hakka food lover. The class was supposed to be just for fun, as an escape to my little world of bliss while being away from my kitchen back home. The problem came after I took a bite of Dorothy's savory meat dumpling spiked with her homemade XO sauce. She had only half a dumpling to distribute among us students, I desperately wanted another

So if you've quickly scrolled down to the recipe, discovered the 'Start this recipe 2 days ahead' bit, let out a snort, rolled your eyes and is slowly inching your mouse towards something less crazy elsewhere, allow me to make my case. This wouldn't be something that require three whole days to make. You could skip making the sauce and use a store bought one, but then you'd be left wondering if yours would taste better and therefore produce dumplings better than all those you've ever eaten. I mean, would you trust a commercial bottle of XO sauce to contain actual dried scallops? Once you've made peace with yourself and decided to concoct up a bottle of spicy, luxurious condiment yourself, you really can whip up the sauce and do the rest of the prep just the day before, but where's the fun in that? You'd be practically stuck in the kitchen the entire day, frying up meat, splitting egg yolks, peeling chestnuts (not a fun job) and be left with no time to savor that awesome sauce you just spent the last hour on with some hot egg noodles, boiled pasta or steaming jasmine rice.


The next day you would refrain from reaching out to that inviting jar of dark red goodness pushed to the far corner of your counter top and instead try to focus on making sure that the pork, mushrooms and dried shrimps make good friends with their marinade overnight for the last thing you want is to spend hours
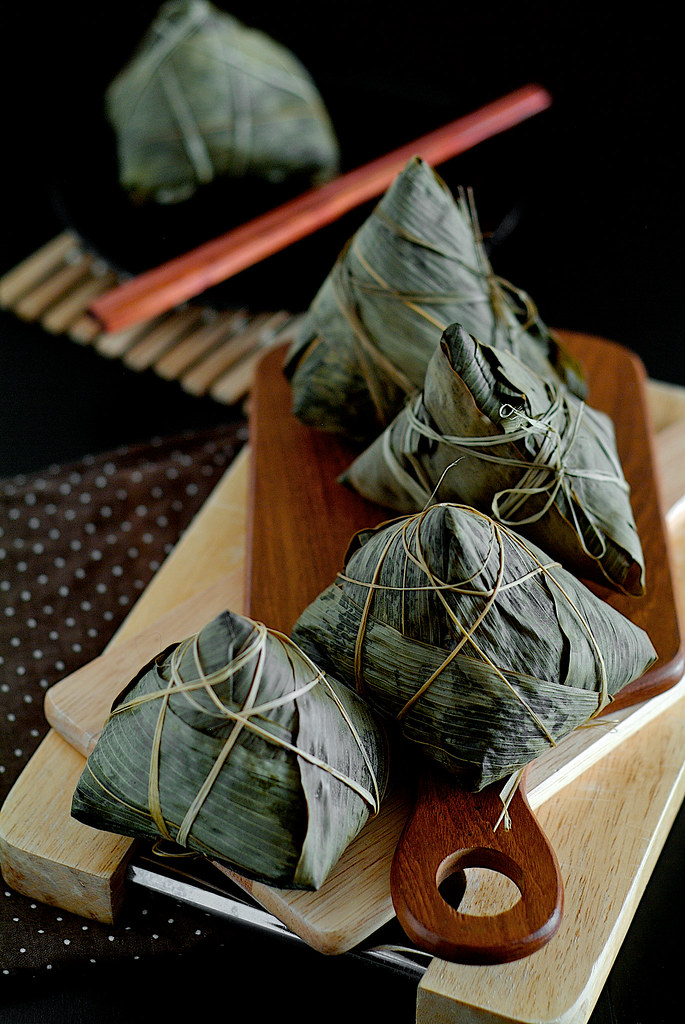
Normally at this point I would go all dramatic and tell you that come day three your blissful zen would soon be over; you would be driven close to tears, swearing and cursing knee deep under a pile of damp leaves, vowing to yourself never to bother with wrapping your own zongzi, ever again. Except this time, on a rainy Saturday morning, I got pass my first tetrahedron dumpling with a small leak and an additional leaf to patch its shortcoming. By the third dumpling I've managed to coax it into a somewhat more respectable shape with just two leaves. Congratulating myself for a rather successful virgin attempt without prior practice, I wrapped the other half of the dumplings Hong Kong style, revising what I learned from Dorothy without much incident.
The incident came later while those babies were boiling. Not confident of my wrapping and tying skills, I peeked into the pot after 10 minutes to check for signs of unraveling dumpling(s), spotted some bits of rice and thought they must have leaked out of the corner of one of my less secured handiwork. I covered the pot, did the dishes and then couldn't help myself from removing the lid again. This time I saw a piece of mushroom happily dancing around in the water. That, I told myself frankly, was not a leak but a total explosion. After
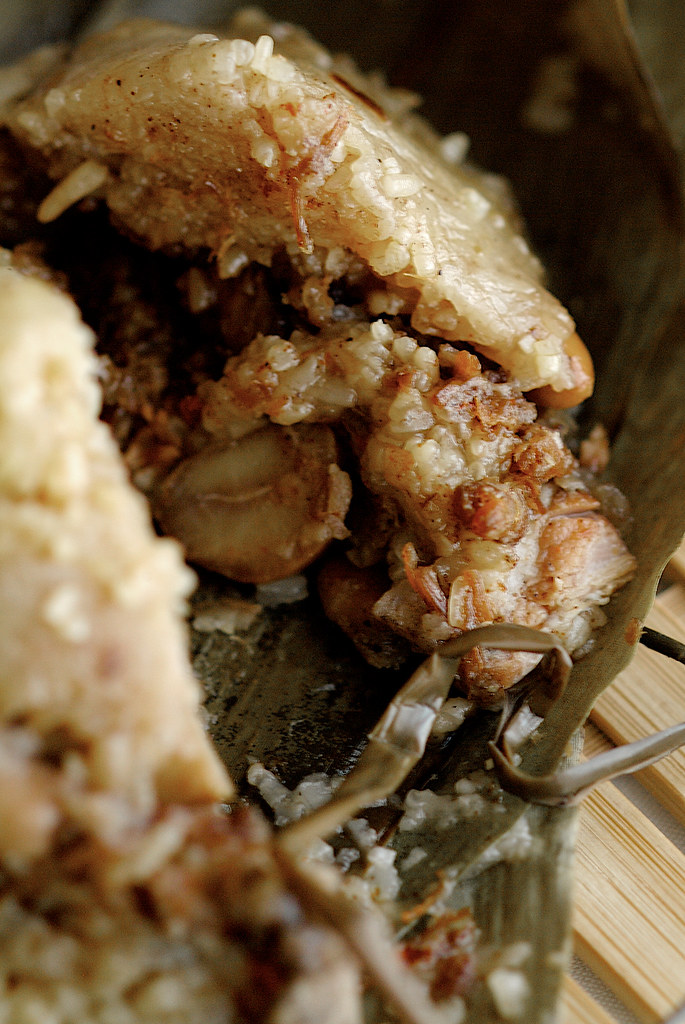
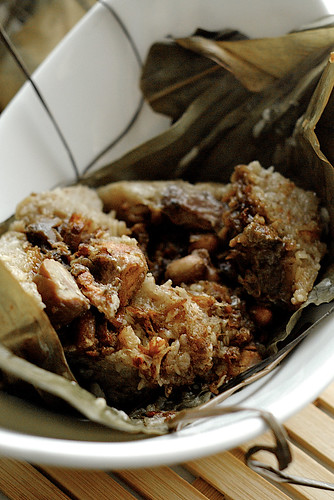
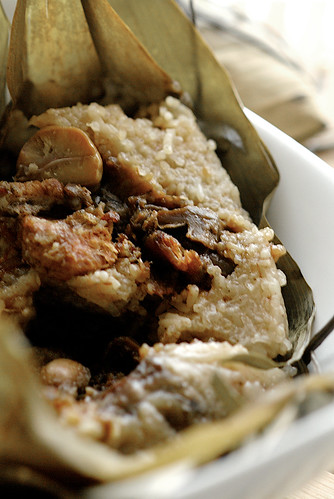
Alas, the slight madness produced surprisingly what he really liked, so much so that for the rest of the week he had one dumpling for dinner each day. Thank God! I wouldn't know what to do with 10 dumplings had they turned out horrible. After two was given away to his boss and one tested by yours truly, I was happy to have taken on this lost tradition not passed to me by my family. While it's unlike the dumplings we have here in Singapore and back in Malaysia, this dumpling would be something special I brought back from my travels and a proof that when you put your heart and soul into making good food, the result would rarely disappoint.
Cantonese Savory Glutinous Rice Dumplings/Zongzi (粽子)
Adapted barely from Dorothy Leung's Cantonese zongzi recipe with some guidance from Joanne Khoo's beautiful Hakka Chan, for I cannot ignore my Hakka roots.
Yields 20-25 dumplings, depending on size of leaves.
Start this recipe 2 days ahead.
Notes:
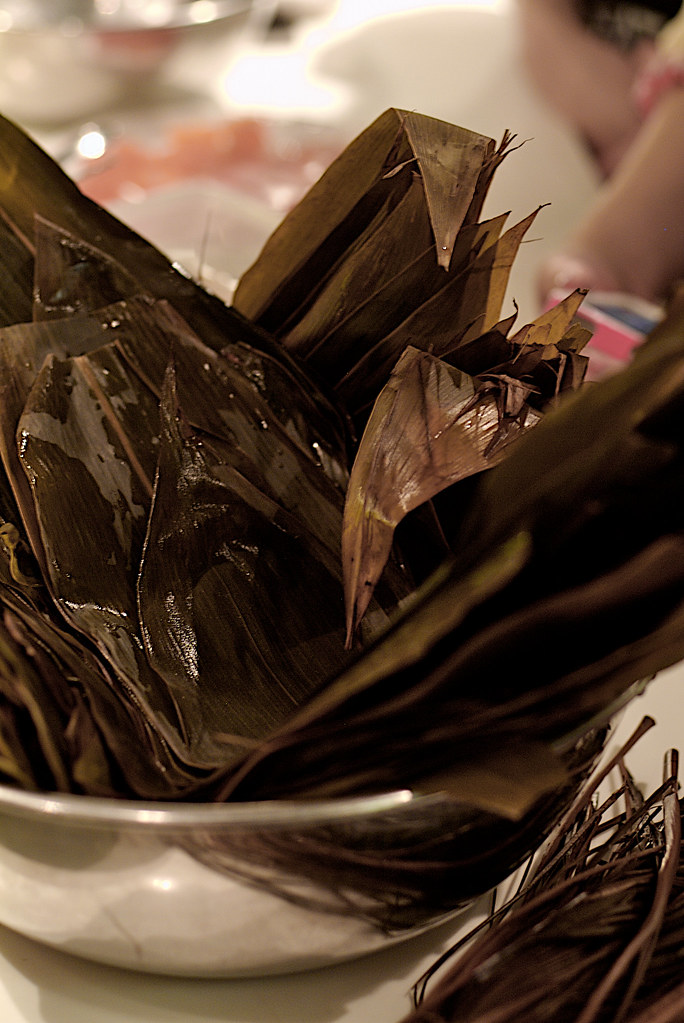
Bamboo leaves: I've written this recipe to make the (usually) standard 20-25 dumplings although in this first attempt I halved my portions to wrap less. If your bamboo leaves are all uniformly big, the ingredients can be reduced to fit for 20 dumplings, otherwise err on some spares for about five dumplings. Be sure to soak/boil enough leaves for your desired recipe portion as you can put aside extra leaves to dry out but wouldn't want to be caught with insufficient leaves to finish wrapping. Pyramid shaped dumplings require 4-5 leaves each while the triangular ones use two large leaves, more in cases of any tear/leakage.
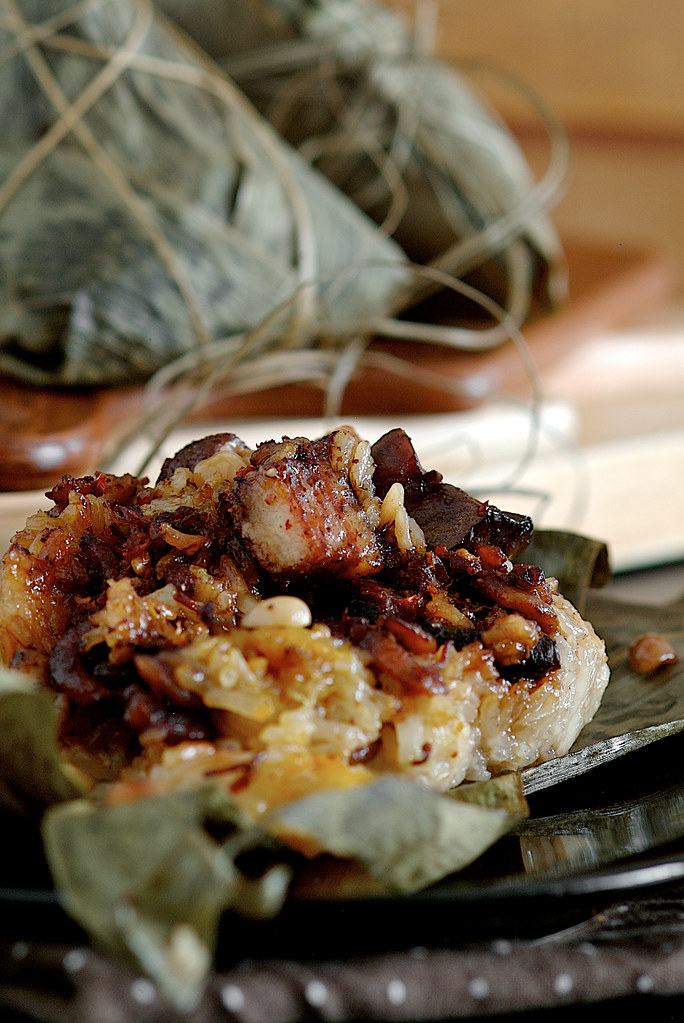
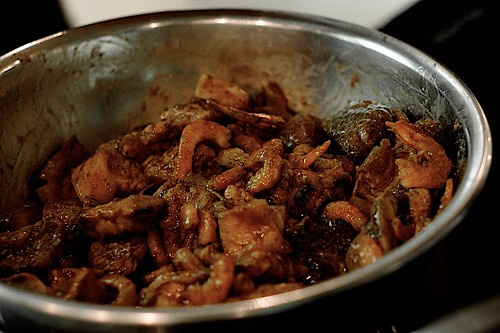
Filling: The filling is best fried the day before to allow time for flavors to develop. You may have noticed I used grapeseed oil for frying the rice and peanut oil for the filling. Dorothy's advice was to use a more mildly flavored oil for the rice - I cook with peanut oil but bake with grapeseed/canola/corn oil - but I reckon if you have only one type of cooking oil it wouldn't hurt. Traditionally the peanuts are boiled or soaked in salted water till tender. We like ours crunchy with more flavor so I roasted them instead. There are several schools of method in preparing the filling. Some like their filling in uniform, small pieces so the meat and mushrooms are cut up and fried together. I like my meat and mushrooms in bigger pieces so they can be eaten separately. For this you can either fry them separately with divided seasonings or fry them all together and then separate them into containers, like I did, another trick taught by my dumpling guru.
Halal option: Pork belly can be replaced with beef or chicken, use the fattiest cuts available as the fat is not only essential for flavor but also keeps the dumplings moist and the rice tender while cooking. You can also mince the beef or chicken to evenly distribute the fatty bits. Shaoxing wine can be omitted or replaced with a mixture of water, sugar and vinegar.
- 80 pieces bamboo leaves (if in a pack use the entire pack for spares)
- 30-40 pieces grass strings (sold together with the leaves, prepare spares in case of breakage, if not available use regular kitchen strings, cut into 4-feet lengths)
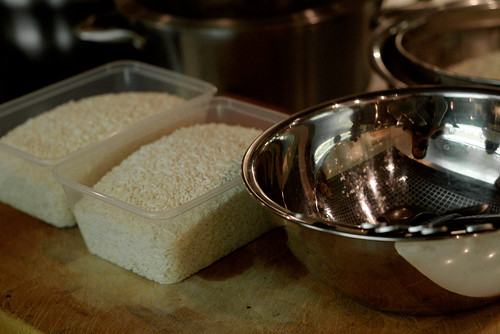
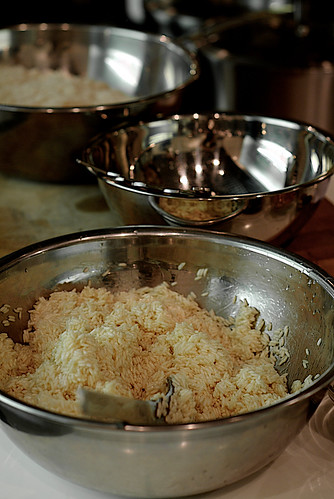
- 1200 grams glutinous rice
- 30 pieces dried shiitake mushrooms
- 500 grams pork belly
- 300 gram fresh peanuts
- 100 grams dried shrimps
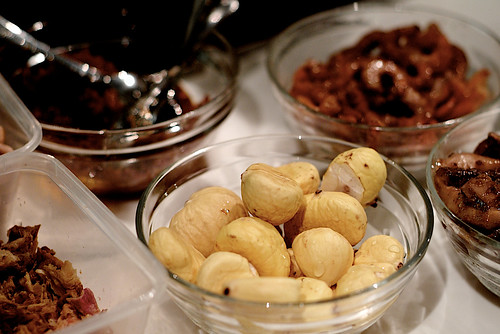
- 30 pieces chestnuts
- 15 pieces salted egg yolks
- 300 grams XO sauce, oil strained and set aside for frying rice
- 120 grams shallots, peeled and sliced thinly
- 3 tablespoons peanut oil
Seasoning for the filling:- 2-3 tablespoons peanut oil
- 4 tablespoons oyster sauce
- 2 tablespoons Chinese five spice powder
- 2 tablespoons soy sauce
- 2 tablespoons dark soy sauce
- 2 tablespoons Shaoxing wine
- 2 teaspoons sesame oil
- salt and pepper to taste
Seasoning for the rice:- 1 tablespoons grapeseed oil
- 1 1/2 tablespoons oil drained from XO sauce used for filling
- 1 1/2 tablespoons oil from frying shallots for the filling
- 3 tablespoons light soy sauce
- 3 tablespoons oyster sauce
- 2 tablespoons Chinese five spice powder
- 1 1/2 teaspoon salt
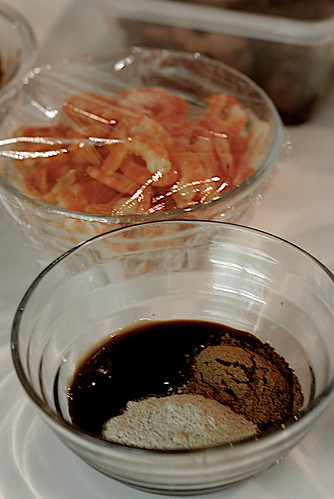
Day 1: If you're a bit crazy like me, you will be using and making your own XO sauce. Prepare this two days before making the dumplings. Caveat: Refrain from consuming too much of the sauce on this day else you would realize there's too little left for your huge dumpling project. Soak the dried mushrooms and chestnuts overnight.
Day 2: This will be the day of filling frying and prepping of all ingredients. I like to get everything ready on this day for less stress on dumpling day. Soak the glutinous rice, bamboo leaves and grass strings overnight. Drain the mushrooms completely and cut bigger pieces into half. Drain and peel the chestnuts. Half the salted egg yolks. Cut the pork belly into pieces about 1-centimeter thick, each piece with layers of skin, fat and meat intact. In a small bowl, mix all the seasoning ingredients for frying the filling except the oils.
In a large wok or frying pan, heat the oil for frying the filling. On medium high heat, add the mushroom and sauté for about one minute. Add in the dried shrimps and toss for another minute. Add in the pork belly. Reduce heat to medium and add in the seasoning mixture. Fry for about 2 minutes, mixing well to coat. Add in the sesame oil, give it another toss and remove to a heatproof bowl. With a pair of chopsticks, separate the mushrooms and pork pieces into two containers, with bits of dried shrimp divided in each. Store all prepped ingredients (egg yolks, chestnuts, mushrooms, meat) in the fridge till needed.
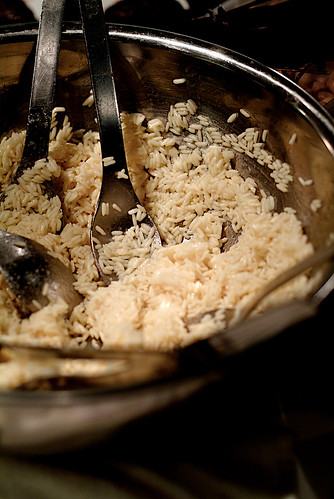
Day 3: On the big day, start by roasting the peanuts and set aside to cool (if boiling/brining instead, you can do this the day before). In a large wok or heavy saucepan on medium low heat, fry the sliced shallots with the peanut oil till golden brown. Remove the shallots onto a piece of kitchen paper and set aside, leaving about 1 1/2 tablespoons of the shallot oil in the wok/pan. Reduce heat to low and add in the rice. Toss briefly to coat and add in the XO sauce oil. Add the in rest of the seasonings and toss quickly just to mix well. Remove the rice into a heatproof bowl and allow to cool for at least 15 minutes. Meanwhile wash the bamboo leaves, drain them and cut off the rigid end of the stems with a pair of kitchen scissors. Set out the grass strings to ensure easy access with no tangles. Arrange rice, leaves, strings and the rest of the filling ingredients to prepare for wrapping.
To wrap the Malaysian/Singaporean style triangular dumpling, layer two bamboo leaves in your palm, smooth side up. Form a cone using the top end of the leaves, making sure the tip of the cone is sealed well. Add in two tablespoons of rice. Layer the rest of the filling ingredients as desired, then top with additional two to three tablespoons rice until the cone is almost full. Press down the rice and filling firmly. Fold the remaining part of the leaves over the top of the cone and wrap tightly around the dumpling (photo guide here by Reese of Season with Spice and video here, thanks to Lisa H. of From My Lemony Kitchen, check out her pretty Nyonya version!). Tie a piece of grass string around it snugly, making sure the dumpling stays in one piece while boiling.
To wrap the Hong Kong style pyramid shaped dumpling, hold a piece of leave on each hand and overlay them to form a cone with the middle part of the leaves, making sure the tip of the cone is sealed well. Add in two tablespoons of rice. Layer the rest of the filling ingredients as desired, then top with additional two to three tablespoons rice, pressing down the rice and ingredients tightly until the cone is full to the brim. Add a piece of leave on each side of the cone, keeping the ends aligned and with about 3 cms of overlay from the brim of the filling. Holding the cone snug with both hands, push down the overlay on the left and right sides with your thumbs, making sure the rice is covered at this point. Fold up the bottom and top ends of the overlaying leaves to seal, forming a rectangular or square dumpling base. Cut off the extra bit of leaves jutting out of the dumpling base if required. To tie, place the half length point of a piece of grass string at the pyramid base. Loop one end of the string around the top of the pyramid, repeat on the opposite side. Twist the string where they meet at the pyramid base to switch direction 90 degrees and repeat the looping to complete the four sides. Knot at the base of the pyramid to secure. Check out the video here, though the tying method is different.
To cook the dumplings, bring a large pot of water (enough to cover all the dumplings) to a boil. Reduce the flame to medium. Place the wrapped dumplings into the water, making sure all of them are fully submerged. Cook covered for 2 hours. Remove and drain completely before unwrapping to serve. If you have a pressure cooker then boil for approximately 30 to 40 minutes on pressure, then depressurize naturally. Wrapped and cooled dumplings can keep for up to two weeks in the fridge or a month in the freezer, just steam them for 15 minutes to reheat.


Continue reading Cantonese Savory Glutinous Rice Dumplings/Zongzi (粽子)
Monday, June 13, 2011
XO Sauce
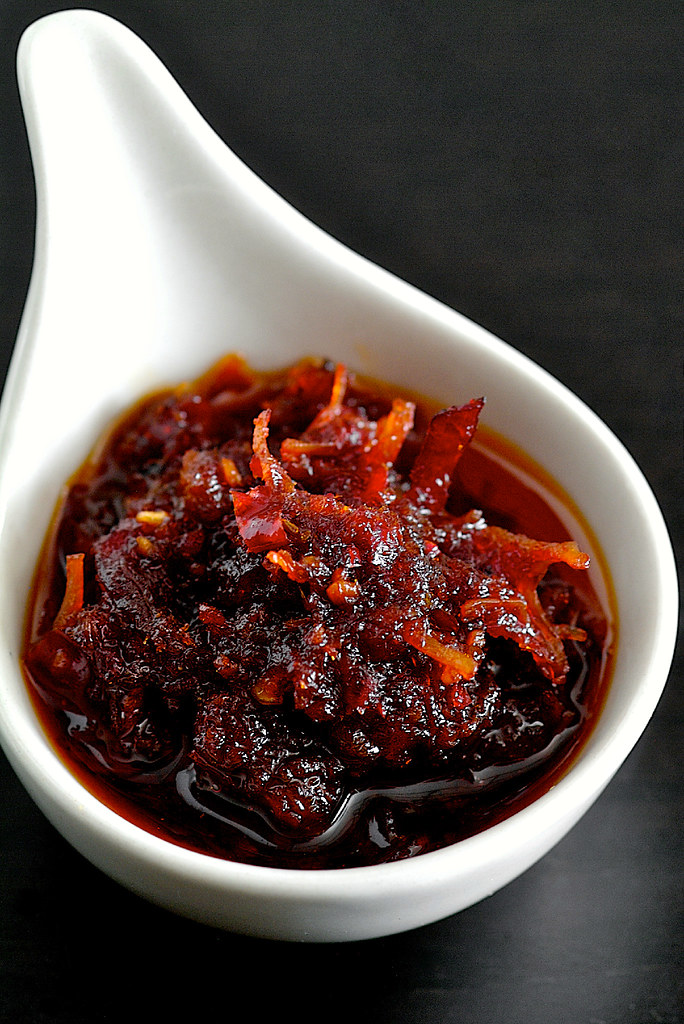
My parents never held back on indulging us with good food and my brother and I were often showered with restaurant level cooking at home. Late dad would wag his finger at my request for a swimming class but would never bat an eyelid lugging home things like pomfret, jumbo king prawns, various dried seafood from his trusted suppliers and dried shiitake mushrooms from Japan. Hardly ever eating out, their food philosophy was to cook the best at home with grade A ingredients. Having said that, XO sauce was never eaten in our home-cooked meals. At Chinese restaurants I would come across meat, seafood, tofu or noodles stir fried with the condiment but was never really curious about it, all the while thinking it's some frou-frou concoction Chinese chefs came up with to market as their restaurant's signature creation. In fact (don't laugh), up till recently, I thought the sauce contains the actual aged XO cognac it's named after.

You can stop laughing now, as I try to recover from my lack of Chinese food knowledge. A recent foray in Hong Kong wrapping Cantonese zongzi laced with this 'caviar of the Orient' and watching a contestant in Australia's My Kitchen Rules making the sauce within an hour nudged me forward to roll up my sleeves, Google the recipe and start chopping. Of course I'd be lying if I omit to tell you I was even more convinced when I found this recipe by Tony Tan from one of my favorite sources, tried and tested by Trissa and pointed out by Ellie (miss your post so much!).
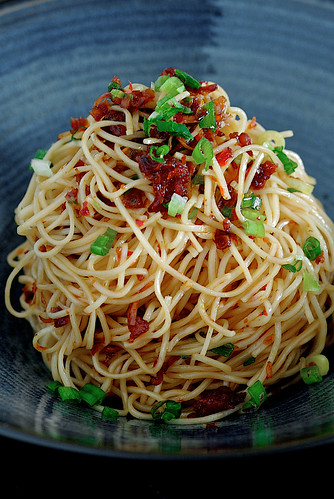
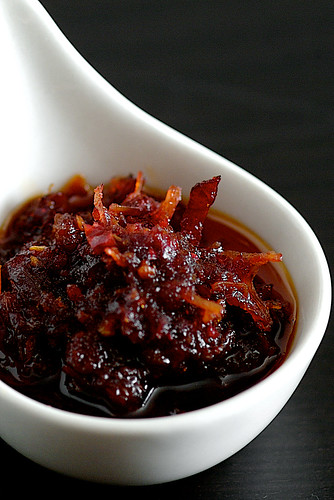
Like most Asian recipes with more than five ingredients calling for 'finely chopped', I was mildly annoyed at the amount of prep it took to put together the mise en place for a (rather) puny jar of sauce. Twenty minutes into frying up the ingredients later though, I quickly changed my mind, blessed the geniuses who came up with this formula and cursed at myself for not doubling the recipe, 'finely chopped' be damned. As the sauce slowly thickens, as you inhale that head spinning umami fragrance and as you silently will the sauce to cook pronto so you could toss it into some piping hot egg noodles to be slurped with your chopsticks, you will finally understand why the sauce is named such, given so much fuss and made in-house at any Chinese restaurants worth their salt.
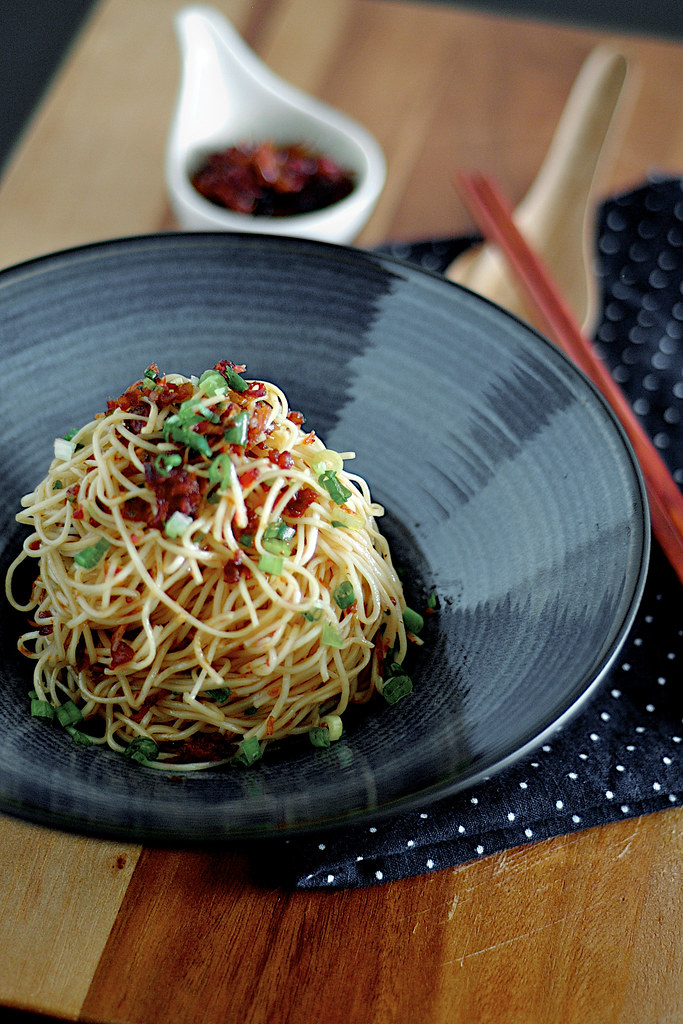
I dare say my version, thanks to Gourmet Traveller AU no less, goes neck in neck with Dorothy's authentic homemade recipe. While it seems formidable covered in fiery looking chili oil and all, the spiciness doesn't get in the way. Just be sure to remove the seeds from the red and dried chilies and you'll be all set. By the time this is written, half of the bottled gem already disappeared into my 10 wrapped rice dumplings (which I will ramble about next time, hopefully not to your detriment) and a few plates of egg noodles between Vijay and I over the weekend. A jar of condiment never goes by at this speed in our house, so don't say I didn't warn you.
XO Sauce
Adapted barely from Tony Tan's recipe in the Australian Gourmet Traveller November 2009 Issue.
Yields about 2 cups.
Prep time 30 minutes, cook time 40 minutes.
Note: Changes made - I added ginger and sake to the original recipe for more flavor. You may use regular sugar or palm sugar; I used brown sugar for flavor and a darker colored sauce. For a halal version, replace the prosciutto/parma ham with raw salty beef bacon and the alcohol with a dash of vinegar. You’ll need to begin this recipe a day ahead for best results. To roast the shrimp paste, wrap in aluminum foil and fry over medium heat for 4-5 minutes. Dried shrimp roe is available from Asian grocers. You may swap belacan with salted fish or dried octopus, which I reckon are more common in a Chinese pantry. While one cup of oil may seem likely to give you a coronary, don't be tempted to reduce it for this amount of ingredients less you want a burnt, dry sauce.
- 25 grams dried scallops
- 75 grams dried prawns
- 250 milliliters (1 cup) vegetable oil, or just enough to cover all the ingredients
- 75 grams garlic (about 20 cloves), finely chopped
- 2 inches ginger, finely minced
- 75 grams red shallots (about 6), finely chopped
- 50 grams jamón ibérico, parma ham or prosciutto, finely shredded
- 25 grams fresh long red chilies (about 6), seeded and finely chopped
- 15 grams dried long red chilies, seeded, soaked and finely chopped
- 7 grams dried birdseye chilies, finely chopped
- 5 grams roasted shrimp paste (belacan; see note)
- 2 tablespoons dried shrimp roe, crumbled (see note; optional)
- 15 grams light brown sugar, or to taste
- 250 milliliters (1 cup) tepid water
- pinch of salt or to taste
- 2 tablespoons sake or Shaoxing wine (optional)
Soak dried scallops and dried prawns separately in 125 milliliters warm water each until plump, preferably overnight. Drain scallops (reserve the soaking water), tear them into fine shreds, pat dry on absorbent paper and set aside. Drain prawns (reserve water), chop them finely and set aside.
Heat half the oil in a wok or large saucepan over medium-high heat, add scallops and deep-fry until very crisp, about 1-2 minutes. Drain well and pour the hot oil into the remaining half set aside earlier. Wipe out wok with absorbent paper, return all the oil into it and bring up to medium heat. Add garlic, shallots, ginger and dried prawns and stir continuously until golden brown, about 4-5 minutes.
Add prosciutto, fresh chilies and dried chilies, fry for a few seconds (be careful and reduce heat if necessary, it may burn easily). Add shrimp paste, fried scallops and reserved scallop and prawn water and stir continuously for a few more seconds. Add remaining ingredients and a pinch of salt (watch the amount as many ingredients are already salty and sauce will reduce). Stir occasionally until fragrant and water has completely evaporated, about 20-30 minutes.
Remove from heat, strain and reserve all the oil. Transfer solids to a sterile jar, then pour in enough reserved oil to cover. Makes about 2 cups. XO sauce will keep refrigerated in a sealed container for 1 month (good luck with that).


Continue reading XO Sauce
Tuesday, June 07, 2011
Hong Kong Part II: Zongzi/Bakchang (粽子/肉粽)
Growing up, I've eaten my share of zongzi (Mandarin 粽子, or bakchang 肉粽 in Hokkien) although my mother didn't manage to obtain any wrapping skills or our family's recipe from my grandmother. I've also only been exposed to the savory variant of the dumpling (filled with pork belly, beans, dried shrimps, salted egg yolk and a chestnut) and always assumed they all look like the triangular ones we eat in Malaysia and Singapore. A recent cooking class at Hong Kong's City Super in accordance with the Dragon Boat Festival (端午節) yesterday opened my eyes to the intriguing shapes of dumplings in Hong Kong and Taiwan.
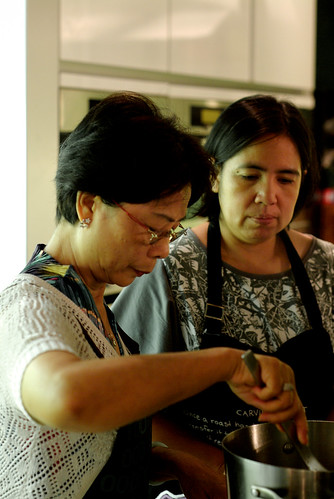
To my delight the instructor turned out to be a friendly and very knowledgeable auntie instead of a restaurant chef. Call me skeptical but I think something traditional like this would be better off learned from someone who has done it for years from family experiences and flavors rather than a commercial chef. Dorothy was very generous with her tips and tricks, all the while encouraging us to take photos and record videos for later references. We started off with the kansui zong (in Cantonese 碱水粽), the alkaline dumpling treated with aqueous sodium carbonate (alkaline water) to obtain a smooth, puffed texture and yellow in color, filled with a sweet center, typically red bean or lotus pastes.

I quickly discovered that wrapping the zong itself was not difficult. The time consuming bits were the preparation of the leaves, rice and other ingredients before hand. The bamboo leaves are best soaked overnight instead of being boiled to maintain it's green color. The glutinous rice also requires at least six hours of soaking and the filling ingredients better cooked the day before for deeper flavor development. Dorothy's savory dumpling recipe included her homemade XO sauce, which kicked ass so much I promptly asked if she could share her recipe, to which she happily replied "That would be another class." Leaving Hong Kong tomorrow, I might just risk emailing her for it.
The kansui zong used two small leaves and took no time at all to wrap. Pre-shape the red bean paste filling into balls or quenelles and place loosely between a few tablespoons of rice. Make sure the wrapped zong is not tightly filled by giving it a shake after folding the leaves to seal. Dorothy's recipe used an ingredient everyone in the class asked if they could omit. Pang sa (boric acid) is a toxic chemical traditionally added when preparing the rice to prevent it from sticking to the leaves after the dumplings are cooked. Since its role is largely cosmetic in the final product, most homemade alkaline dumpling recipes do without it.
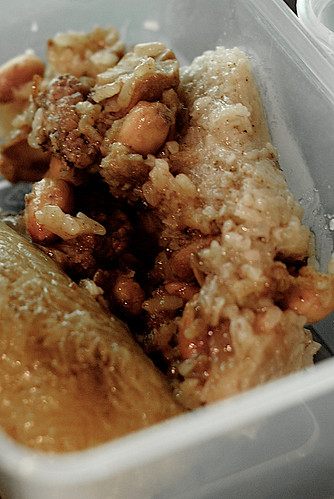
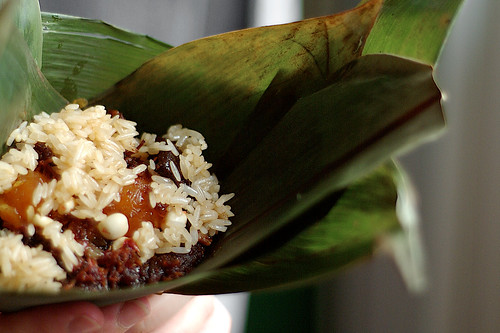
The salty pork dumpling which I would attempt to make once I get back took some maneuvering to wrap. I put as much meat and other stuffing items as I could muster into the rather smallish dumplings and you can see from the photos the results of my amateurish attempt complete with bits of uncooked rice trapped on the top. When wrapping a savory zong it's crucial to pack the filling tightly and press down while wrapping to produce a neat dumpling with evenly cooked rice. Dorothy pointed out that it's not always possible to get large leaves from the market so we will have to be flexible enough to add extra leaves and use torn leaves as well when making zong in bulk (a typical recipe makes 20 to 25 dumplings). Just make sure there are no exposed rice or filling poking out of the wrapped product before tying it up.

She also demonstrated a better tying method looping around the peak of the dumpling instead of just going by the sides to avoid slipping. I've never eaten dumplings with XO sauce before and loved Dorothy's version. As every family probably have their own recipes, making zongzi, like a lot of home cooking, is not about hard and fast rules. It's about love wrapped in a bundle of rice with the favorite things of you and your family. There's no need to fuss about the exact measurements and seasonings used. The traditional agak agak (roughly in Malay) approach and a little bit of patience would do to create the ultimate dumpling you would enjoy.
What's more important is to prepare and cook the rice to the right consistency before wrapping. In the excitement of telling us her stories in our class, Dorothy got a little carried away and misjudged just by a hair the amount of moisture required for the savory zong but even that didn't affect the dumpling much. The possibilities of filling ingredients are endless. You can make halal versions with chicken thigh, lamb or beef; healthier options with lean meat and more beans or even vegetarian ones with black-eye peas, a variety of mushrooms, nuts and mung beans. As we sampled the dumplings Dorothy made for us beforehand, I didn't care much for the sweet ones for more than a couple of reasons, I reckoned. I didn't like the idea of using alkaline water, the rice bits were largely tasteless and I just couldn't get my head around a sweet zong - it's all about what you grew up with sometimes.
Her awesome meat dumpling though, convinced me to arrange for the procurement of bamboo leaves as soon as logistically possible in Singapore as by the time I land the markets would no longer be selling any (thanks so much Sherie!). Zongzi are available all year long in Malaysia and Singapore long after the festival, so no one really need an excuse to eat some. It's just that only during this period the bamboo leaves and grass 'strings' are easily available at neighborhood wet markets. Towards the end of the class, Dorothy provided us her contact information and reminded us to call her should we face any difficulties or have any questions when trying this stint out at home. She said that the best satisfaction for her would be for us to really take our lesson home and actually make some dumplings. Now, if you think that's cool of her, read on.
The dumplings we wrapped were to be packed up to be boiled at home. Staying in a hotel room, there was no way I could do that so I told Dorothy to take mine and have it for herself, if she didn't mind dealing with my newbie end products. I was floored when she offered to cook them for me to be collected another day, just so that I can taste the fruits of my 'labor'. Tasty dumplings aside, what I also took with me from Dorothy's class was an important reminder - cook with passion and attention to detail for best satisfaction, it will not only show through your food and but touch those who are blessed with it.
I don't know if I can pull this off but I'm definitely going to attempt wrapping some savory zong with homemade XO sauce. Should I succeed you'll hear me going on about it here and I hope your eyes won't glaze over another post on dumplings. As I'm currently still shooting with only prime lenses, I couldn't photograph the entire wrapping process clearly. The wrapping methods for both Hong Kong and Taiwanese style dumplings are here and here respectively. In the latter, notice how the grandmother eventually instructed the addition of an extra leaf to cover the apprentice's dumpling. They also began with two leaves instead of one as they were wrapping a larger savory dumpling instead of a small alkaline one.
Related Posts:


Continue reading Hong Kong Part II: Zongzi/Bakchang (粽子/肉粽)
Life Is Great explores the incredible world of food and cooking. We hope to share with you our most delicious moments and inspirations.
“Just like becoming an expert in wine–you learn by drinking it, the best you can afford–you learn about great food by finding the best there is, whether simply or luxurious. The you savor it, analyze it, and discuss it with your companions, and you compare it with other experiences.”
Julia Child (Mastering the Art of French Cooking)
“Life is short. Live your dream and share your passion.”
RESOURCES
RECIPES

CAKE ORDERS

EATING OUT
FOOD READS
SUBSCRIPTION
RECENT RECIPES
- Gooey Cinnamon Cake
- Chinese Crispy Roast Pork Belly (Siu Yuk 烧肉)
- ABC Soup (罗宋汤)
- Kong Bak Pau (扣肉包)
- Pandan Chiffon Cake (Improved)
- Crispy Fried Egg
- Tamago Kake Gohan (卵かけご飯)
- Strawberry Pie
- One Pot Chicken Rice
- Bak Chor Mee (肉脞面 - Minced Pork Noodle)
- Hakka Salted Egg Steamed Pork (咸蛋蒸猪肉)
RECENT TRAVELS
- Hong Kong Part III
- Hong Kong Part II: Zongzi/Bakchang (粽子/肉粽)
- Caffè HABITŪ (the table) at G.O.D. Causeway Bay, Hong Kong
- Hong Kong Part I
- Australia 2010 Part 1: Melbourne
- Bourke Street Bakery, Sydney
- Il Fornaio, St Kilda
- Queen Victoria Market, Melbourne
ARCHIVES
FEEDBACK
Recent Comments
Statcounter